
直接使用官方的镜像,一条命令,我们就能够启动一个包含了最新版本的 CUDA 和 PyTorch 的实验环境(23.02的文档)。
(特别适合某些新显卡发布,新cuda版本发布,而此时 Conda 社区还未做兼容适配)
docker run --gpus all -it --rm nvcr.io/nvidia/pytorch:23.02-py3
如果我们在容器里执行 nvidia-smi 来检查运行环境以及获取显卡的状态:
docker run --gpus all -it --rm nvcr.io/nvidia/pytorch:23.02-py3 nvidia-smi
就会提示并行计算需要的缓存是不足的。
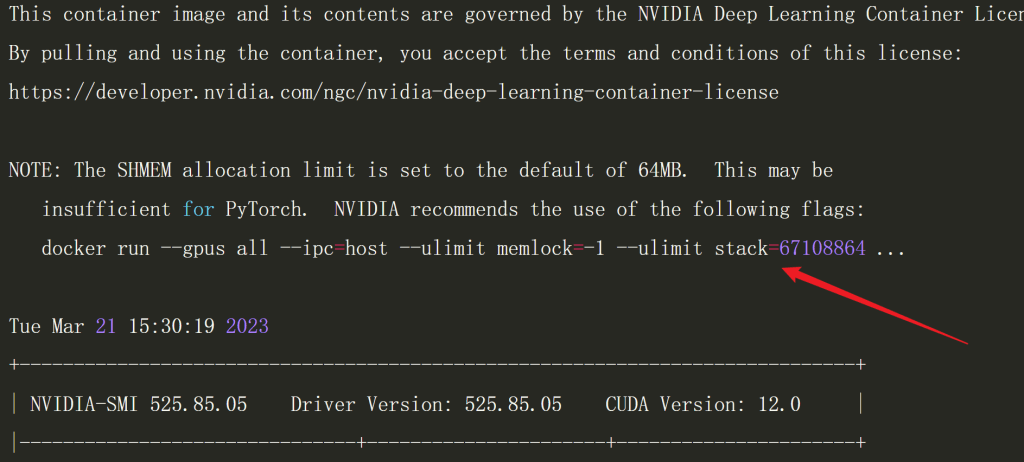
为了最佳的性能实现,我们可以继续调整命令如下:
docker run --gpus all --ipc=host --ulimit memlock=-1 --ulimit stack=67108864 -it --rm nvcr.io/nvidia/pytorch:23.02-py3

# 指定某张显卡
......  --gpus "0"  ......

# 指定多张显卡
......  --gpus "1,3,5,7"  ......
在此基础上构建应用镜像(以GFPGAN举例)
Dockerfile (位于docker子目录下):
FROM nvcr.io/nvidia/pytorch:23.04-py3

RUN pip install gfpgan==1.3.8 realesrgan==0.3.0 facexlib==0.3.0 gradio==3.39.0 opencv-python==4.8.0.74

WORKDIR /app
COPY src/app.py ./
COPY ./model /app/model
COPY ./gfpgan /app/gfpgan

CMD ["python", "app.py"]
踩坑记录:
- opencv-python==4.8.0.74 不能高于这个版本,否则报错。
- 构建镜像的时候就把模型model(下载地址在下面)一起打包进去,否则win环境下挂载比较麻烦: “COPY ./model /app/model COPY ./gfpgan /app/gfpgan”
构建镜像:
docker build -t zhumao/docker-gfpgan . -f docker/Dockerfile
模型调用程序
保存为app.py文件,放在src文件夹下:
import os
import cv2
import gradio as gr
import torch
from basicsr.archs.srvgg_arch import SRVGGNetCompact
from basicsr.archs.rrdbnet_arch import RRDBNet
from gfpgan.utils import GFPGANer
from realesrgan.utils import RealESRGANer

def set_realesrgan(version):
    half=True if torch.cuda.is_available() else False
    if version == 'v3':
        model = SRVGGNetCompact(num_in_ch=3, num_out_ch=3, num_feat=64, num_conv=32, upscale=4, act_type='prelu')
        return RealESRGANer(scale=4, model_path='model/realesr-general-x4v3.pth', model=model, tile=0, tile_pad=10, pre_pad=0, half=half)
    else:
        model = RRDBNet(num_in_ch=3, num_out_ch=3, num_feat=64, num_block=23, num_grow_ch=32, scale=2)
        return RealESRGANer(scale=2, model_path='model/RealESRGAN_x2plus.pth', model=model, tile=400, tile_pad=10, pre_pad=0, half=half)

def set_face_enhancer(upsampler, version):
    if version == 'RestoreFormer':
        return GFPGANer(model_path='model/RestoreFormer.pth', upscale=2, arch='RestoreFormer', channel_multiplier=2, bg_upsampler=upsampler)
    else:
        if version == 'CPU':
            model_path='model/GFPGANCleanv1-NoCE-C2.pth'
        elif version == 'v1':
            arch = 'original'
            channel_multiplier = 1
            model_path='model/GFPGANv1.pth'
        elif version == 'v1.2':
            arch = 'clean'
            channel_multiplier = 2
            model_path='model/GFPGANv1.2.pth'
        elif version == 'v1.3':
            arch = 'clean'
            channel_multiplier = 2
            model_path='model/GFPGANv1.3.pth'
        elif version == 'v1.4':
            arch = 'clean'
            channel_multiplier = 2
            model_path='model/GFPGANv1.4.pth'

    return GFPGANer(model_path=model_path, upscale=2, arch=arch, channel_multiplier=channel_multiplier, bg_upsampler=upsampler)

os.makedirs('output', exist_ok=True)

def inference(img, realesrgan_version, gfpgan_version, scale):
    if scale > 4:
        scale = 4
    elif scale < 0:
        scale = 1

    try:
        extension = os.path.splitext(os.path.basename(str(img)))[1]
        img = cv2.imread(img, cv2.IMREAD_UNCHANGED)
        if len(img.shape) == 3 and img.shape[2] == 4:
            img_mode = 'RGBA'
        elif len(img.shape) == 2:  # for gray inputs
            img_mode = None
            img = cv2.cvtColor(img, cv2.COLOR_GRAY2BGR)
        else:
            img_mode = None

        h, w = img.shape[0:2]
        if h > 3500 or w > 3500:
            print('too large size')
            return None, None

        if h < 300:
            img = cv2.resize(img, (w * 2, h * 2), interpolation=cv2.INTER_LANCZOS4)

        upsampler = set_realesrgan(realesrgan_version)
        face_enhancer = set_face_enhancer(upsampler, gfpgan_version)

        try:
            _, _, output = face_enhancer.enhance(img, has_aligned=False, only_center_face=False, paste_back=True, weight=None)
        except RuntimeError as error:
            print('Error', error)

        try:
            if scale != 2:
                interpolation = cv2.INTER_AREA if scale < 2 else cv2.INTER_LANCZOS4
                h, w = img.shape[0:2]
                output = cv2.resize(output, (int(w * scale / 2), int(h * scale / 2)), interpolation=interpolation)
        except Exception as error:
            print('wrong scale input.', error)
        if img_mode == 'RGBA':  # RGBA images should be saved in png format
            extension = 'png'
        else:
            extension = 'jpg'
        save_path = f'output/out.{extension}'
        cv2.imwrite(save_path, output)

        output = cv2.cvtColor(output, cv2.COLOR_BGR2RGB)
        return output, save_path
    except Exception as error:
        print('global exception', error)
        return None, None

description = r"""Gradio demo for <a href='https://github.com/TencentARC/GFPGAN' target='_blank'>GFPGAN: Towards Real-World Blind Face Restoration with Generative Facial Prior</a>.<br>
这个应用可以被用来修复你的**老照片**或者改善**AI生成的人脸**。<br>
你只需要上传你的图片,就可以使用它。<br>
如果你觉得这个项目帮助到了你,不妨为 <a href='https://github.com/TencentARC/GFPGAN' target='_blank'>它</a> 点个Star吧 :-D <br>
"""

radio_realesrgan_version = gr.Radio(['v3'], type="value", value='v3', label='RealESR GAN version')
radio_gfpgan_version = gr.Radio(['CPU', 'v1.2', 'v1.3', 'v1.4', 'RestoreFormer'], type="value", value='v1.4', label='version')
if os.environ.get('BASICSR_JIT') is not None:
    radio_realesrgan_version = gr.Radio(['v2', 'v3'], type="value", value='v3', label='RealESR GAN version')
    radio_gfpgan_version = gr.Radio(['CPU', 'v1', 'v1.2', 'v1.3', 'v1.4', 'RestoreFormer'], type="value", value='v1.4', label='version')

app = gr.Interface(
    inference, [
        gr.Image(type="filepath", label="Input"),
        radio_realesrgan_version,
        radio_gfpgan_version,
        gr.Number(label="Rescaling factor", value=2),
    ], [
        gr.Image(type="numpy", label="Output (The whole image)"),
        gr.File(label="Download the output image")
    ],
    title="GFPGAN: 实用的人脸修复算法",
    description=description,
    article="<p style='text-align: center'>written by: <a href='https://fly-uni.com' target='_blank'>@zhumao</a></p>",
# examples=[['AI-generate.jpg', 'v1.4', 2], ['lincoln.jpg', 'v1.4', 2], ['Blake_Lively.jpg', 'v1.4', 2], ['10045.png', 'v1.4', 2]]
)
app.queue()
app.launch(server_name="0.0.0.0")
目录结构:
├── docker
├── gfpgan
│   └── weights
│       ├── detection_Resnet50_Final.pth
│       └── parsing_parsenet.pth
├── LICENSE
├── model
│   ├── GFPGANCleanv1-NoCE-C2.pth
│   ├── GFPGANv1.2.pth
│   ├── GFPGANv1.3.pth
│   ├── GFPGANv1.4.pth
│   ├── GFPGANv1.pth
│   ├── README.md
│   ├── RealESRGAN_x2plus.pth
│   ├── realesr-general-x4v3.pth
│   └── RestoreFormer.pth
├── README.md
├── scripts
└── src
模型下载:
下载完毕后,解压缩,将 gfpgan、model 按照上面的目录结构放好即可。
运行模型:
(如果你没有把模型打包进镜像里,此处就要挂载模型 “-v `pwd`/model:/app/model -v `pwd`/gfpgan:/app/gfpgan”)
docker run --name zhumao-gfpgan --gpus all --ipc=host --ulimit memlock=-1 --ulimit stack=67108864 -it -d -p 7860:7860 zhumao/docker-gfpgan
稍等片刻,我们将看到类似下面的成功提示:
Running on local URL:  http://127.0.0.1:7860

To create a public link, set `share=True` in `launch()`.
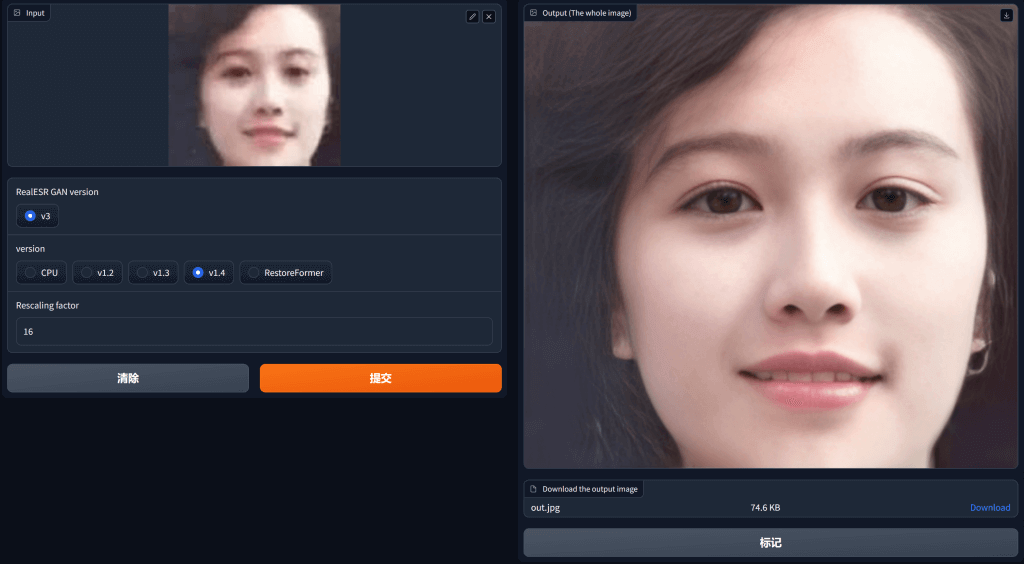
接着,我们就可以打开浏览器访问 http://localhost:7860 或者 ‘http://你的IP地址:7860’ 来使用Gradio 界面了。
Gradio 图形化界面:

参考:
https://soulteary.com/2023/03/22/docker-based-deep-learning-environment-getting-started.html