
Nextjs 是一个基于React的服务端渲染框架.
Tailwind 无需书写 CSS,即可快速构建美观的网站的组件库.
Contentlayer 将内容转换成JSON并导入应用程序.
前期准备
- Nodejs >= 18.17.x
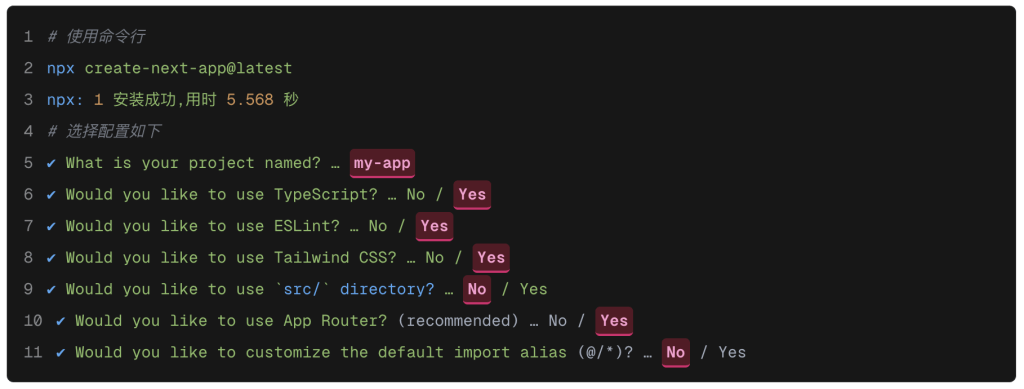
初始化项目
# 使用命令行
npx create-next-app@latest
npx: 1 安装成功,用时 5.568 秒
# 选择配置如下
✔ What is your project named? … my-app
✔ Would you like to use TypeScript? … No / Yes
✔ Would you like to use ESLint? … No / Yes
✔ Would you like to use Tailwind CSS? … No / Yes
✔ Would you like to use `src/` directory? … No / Yes
✔ Would you like to use App Router? (recommended) … No / Yes
✔ Would you like to customize the default import alias (@/*)? … No / Yes
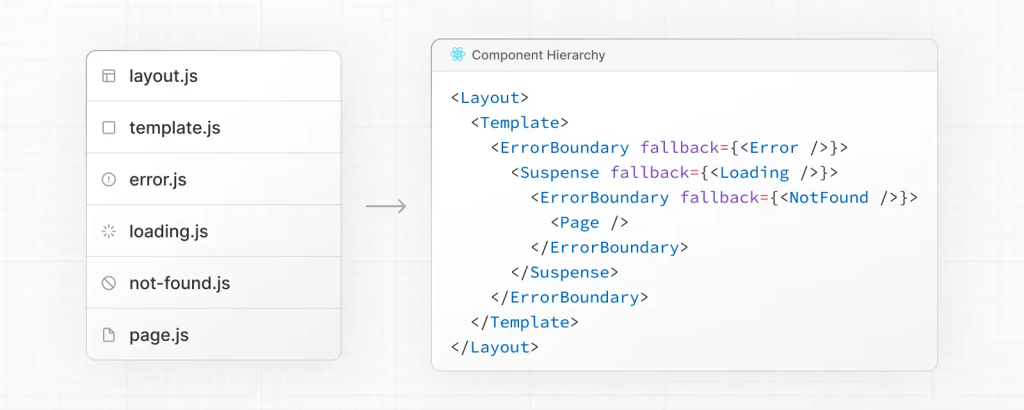
Nextjs应用页面层次如下
- layout.js
- template.js
- error.js (React error boundary)
- loading.js (React suspense boundary)
- not-found.js (React error boundary)
- page.js
对应React渲染路由如下
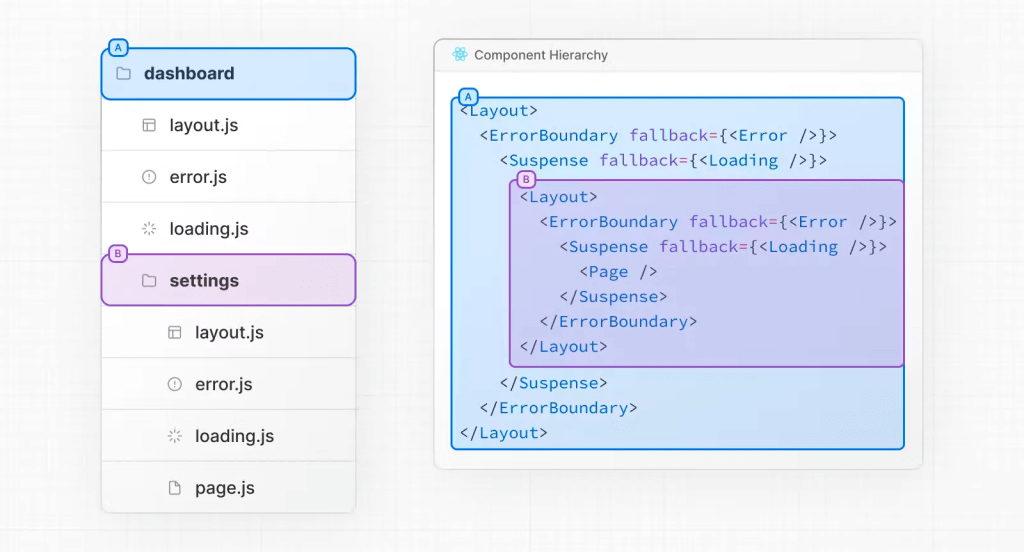
嵌套路由只需要嵌套父应用里面即可
新建博客页面
app/blog/[slug]/page.tsx
import { allBlogs } from 'contentlayer/generated'
import { notFound } from 'next/navigation'
import { useMDXComponent } from 'next-contentlayer/hooks'

type BlogSlugProps = {
  params: {
    slug: string
  }
}

export default function BlogSlug({ params }: BlogSlugProps) {
  const post = allBlogs.find((post) => post.slug === params.slug)
  if (!post) {
    notFound()
  }

  const Component = useMDXComponent(post.body.code)

  return (
    <section className="prose prose-stone">
      <Component />
    </section>
  )
}
新建MDX文件
content/1-post.mdx
---
title: 'first post'
publishedAt: '2023-11-11'
summary: 'This is your first blog post.'
---

- first post
- test

`import numpy as np`
解析MDX
使用Contentlayer来解析mdx文件,项目根目录下新建contentlayer.config.ts文件
安装以下依赖
npm install contentlayer next-contentlayer @tailwindcss/typography
- @tailwindcss/typography: tailwind风格的HTML排版
contentlayer.config.ts
import { defineDocumentType, makeSource } from 'contentlayer/source-files'

export const Blog = defineDocumentType(() => ({
  name: 'Blog',
  filePathPattern: '**/*.mdx',
  contentType: 'mdx',
  fields: {
    title: {
      type: 'string',
      required: true,
    },
    summary: {
      type: 'string',
      required: true,
    },
    publishedAt: {
      type: 'string',
      required: true,
    },
  },
  computedFields: {
    slug: {
      type: 'string',
      resolve: (doc) => doc._raw.flattenedPath,
    },
  },
}))

export default makeSource({
  contentDirPath: 'content',
  documentTypes: [Blog],
})
修改根目录下的next.config.js文件
next.config.js
const { withContentlayer } = require('next-contentlayer')

/** @type {import('next').NextConfig} */
const nextConfig = {}

module.exports = withContentlayer(nextConfig)
修改根目录下的tsconfig.json文件
添加下面行中的代码到tsconfig.json或jsconfig.json文件中。
// tsconfig.json
{
  "compilerOptions": {
    "baseUrl": ".",
    //  ^^^^^^^^^^^
    "paths": {
      "contentlayer/generated": ["./.contentlayer/generated"]
      // ^^^^^^^^^^^^^^^^^^^^^^^^^^^^^^^^^^^^^^^^^^^^^^^^^^^^
    }
  },
  "include": [
    "next-env.d.ts",
    "**/*.ts",
    "**/*.tsx",
    ".next/types/**/*.ts",
    ".contentlayer/generated"
    // ^^^^^^^^^^^^^^^^^^^^^^
  ]
}
这些配置将使告诉Next.js构建过程和你的编辑器在哪里寻找生成的文件,并让它们在你的代码更容易导入。
运行 npm run dev 会发现项目中新增一个 .contentlayer 文件夹,打开后可以找到我们编写的 .mdx 文件已经被解析成对应的 .json 文件。由于 .contentlayer 该文件夹是运行的时候生成的,我们需要在提交代码的时候忽略掉
需要在 .gitignore 文件中增加 .contentlayer
根目录下 tailwind.config.ts 文件需要配置 @tailwindcss/typography 插件
tailwind.config.ts
import type { Config } from 'tailwindcss'
import typography from '@tailwindcss/typography'

const config: Config = {
  content: [
    './pages/**/*.{js,ts,jsx,tsx,mdx}',
    './components/**/*.{js,ts,jsx,tsx,mdx}',
    './app/**/*.{js,ts,jsx,tsx,mdx}',
    './content/**/*.mdx',
  ],
  theme: {
    extend: {
      backgroundImage: {
        'gradient-radial': 'radial-gradient(var(--tw-gradient-stops))',
        'gradient-conic':
          'conic-gradient(from 180deg at 50% 50%, var(--tw-gradient-stops))',
      },
    },
  },
  plugins: [typography],
}
export default config
解析数据
我们打开 app/page.tsx 文件,修改代码如下
import { allBlogs } from 'contentlayer/generated'
import Link from 'next/link'

export default function Home() {
  return (
    <section>
      {allBlogs
        .sort((a, b) => {
          if (new Date(a.publishedAt) > new Date(b.publishedAt)) {
            return -1
          }
          return 1
        })
        .map((item) => (
          <Link
            key={item.slug}
            href={`/blog/${item.slug}`}
            className='mb-5'
          >
            {item.title}
          </Link>
        ))}
    </section>
  )
}
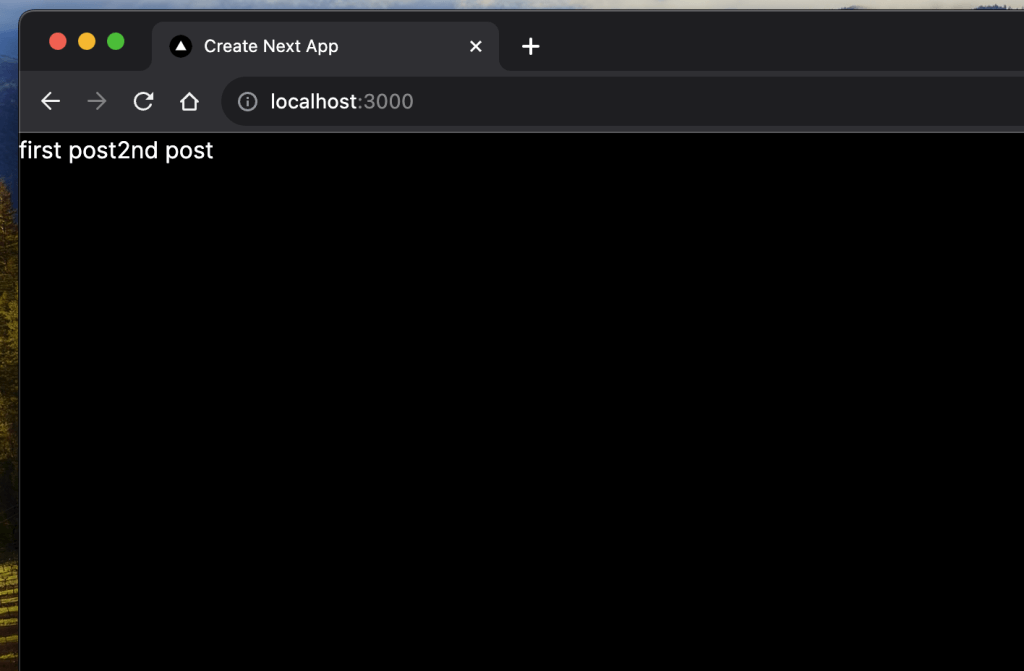
页面展示如下:
精简版博客框架搭建完成,可以通过写mdx文档来写博客啦。
后续会继续补充外观元素。
参考:
https://www.199406.xyz/blog/use-nextjs-create-blog